Admin Console — Staff Guide
For store staff who manage products, orders, customers, and settings.
Store URLs
Set in the API .env by your administrator. Sign in at the Admin console URL
only.
| Application | Variable | Local development |
|---|---|---|
| Storefront (online store) | STOREFRONT_URL |
https://bnf-asia.com |
| Admin console | ADMIN_URL |
https://dashboard.bnf-asia.com |
Log in: Open the Admin console URL and sign in with your staff email and password.
1 Getting started
Sign in
- Open the Admin console URL in a web browser.
- Enter your staff email and password.
- Click Sign in — you land on the Dashboard.

If you forget your password, contact a Super Admin to reset your account. Super Admins invite additional staff under Account → Users → Invite staff. See Admin user onboarding for the full plan.
Your staff account
Path: Sidebar → Account — view your email, role, and permission count; change your password here.

Roles and access
Super Admin
Full access — settings, payment keys, users, audit logs, and all catalog/order tools.
Store Manager
Catalog, orders, storefront CMS, reviews, abandoned carts — not customers, vouchers, settings, or user management.
If a menu item is missing or you see "Unauthorized", ask a Super Admin to check your role under Users or Roles.
1a Admin user onboarding plan
Use this plan whenever someone new needs Admin Console access — from the first Super Admin at launch to day-to-day staff invites.
| Path | Who runs it | When |
|---|---|---|
| A — First Super Admin | Technical administrator | Once, during initial store setup |
| B — Invite staff | Existing Super Admin | Each new team member after launch |
Path A — First Super Admin (initial setup)
The platform administrator creates the first account during deployment — not from the admin UI.
- Confirm
STOREFRONT_URLandADMIN_URLin the API.envmatch deployed apps. - Create the first Super Admin via the API seed process (see project README).
- Send the store owner the Admin console URL, storefront URL, sign-in email, and temporary password (secure channel only).
- Owner signs in, changes password under Account, then completes Settings → Overview.
- Owner invites additional staff via Path B as the team grows.
Never commit admin credentials or .env files to source control.
Path B — Invite a new staff member
Before inviting: choose role (default Store Manager unless they need settings or user management), confirm work email, generate a unique temporary password (min. 6 characters).
- Open Account → Users and click Invite staff.
- Enter email and temporary password.
- Select Super Admin or Store Manager — see Roles for permissions.
- Click Create account.
- Share Admin console URL, email, and temporary password securely (password manager or in-person — not plain email if policy forbids).
- Optionally confirm
STAFF_CREATEDin Settings → Audit logs.

New user — first login checklist
- Sign in at the Admin console URL with the temporary password.
- Account → change password (current = temporary password).
- Confirm your role and permissions on the Account page.
- Bookmark the Admin console URL; use Chrome, Edge, or Safari.
- Complete role training in section 13.
- Sign out on shared computers when finished.
Choosing a role
| If the person needs to… | Assign |
|---|---|
| Process orders, manage catalog, edit homepage, moderate reviews | Store Manager |
| Configure payments, shipping, email, vouchers, invite staff, view customers or audit logs | Super Admin |
Limit Super Admin to owners and operations leads. Start with Store Manager when unsure — promote later via Users → Change role.
Offboarding
- Users → row menu → Deactivate account when someone leaves or access is revoked.
- To reset access: Change role and optionally set a new password, or Activate account if previously deactivated.
Do not delete staff accounts — deactivation preserves audit history.
3 Dashboard (/)

Operations row
- Orders today
- Pending fulfillment (paid, not yet shipped)
- Follow-up queue (unpaid orders and quotes)
- Stale quotes (support-assisted orders past the alert threshold)
Needs attention
Quick links when something requires action: pending reviews, payment exceptions, awaiting fulfillment, quotes awaiting review, stale quotes, low stock products, abandoned carts.
Platform health
Checks whether shipping rates, payment gateways, email delivery, and pickup locations are configured. Amber or red items usually need a Super Admin under Settings.
Analytics
- Pick a date range with the range picker (defaults to last 30 days)
- Revenue and average order value
- Revenue chart
- Top products
- Low stock — uses the threshold from Settings → General (Checkout tab)
- Abandoned carts count
Send recovery emails
Sends abandoned-cart messages to eligible carts (after the configured delay). Confirm the abandoned_cart email template under Settings → Email templates. Optional recovery discount code is set under Settings → General (Checkout tab).
Analytics page
Path: Sidebar → Analytics — full sales report with CSV export, top products, cart recovery, and low stock links (separate from the Dashboard summary charts).
4 Orders
Order queues
/orders
/orders/queue
Order list (/orders)

- Search by order number or customer email
- Filter payment and shipping status, date range
- Export CSV
- Create order — manual order for phone/email sales
- Open a row for full detail
Fulfillment queue (/orders/queue)

Follow-up queue (/orders/follow-up)

Support inbox (/support/inbox)

Create order (/orders/new)

Order detail
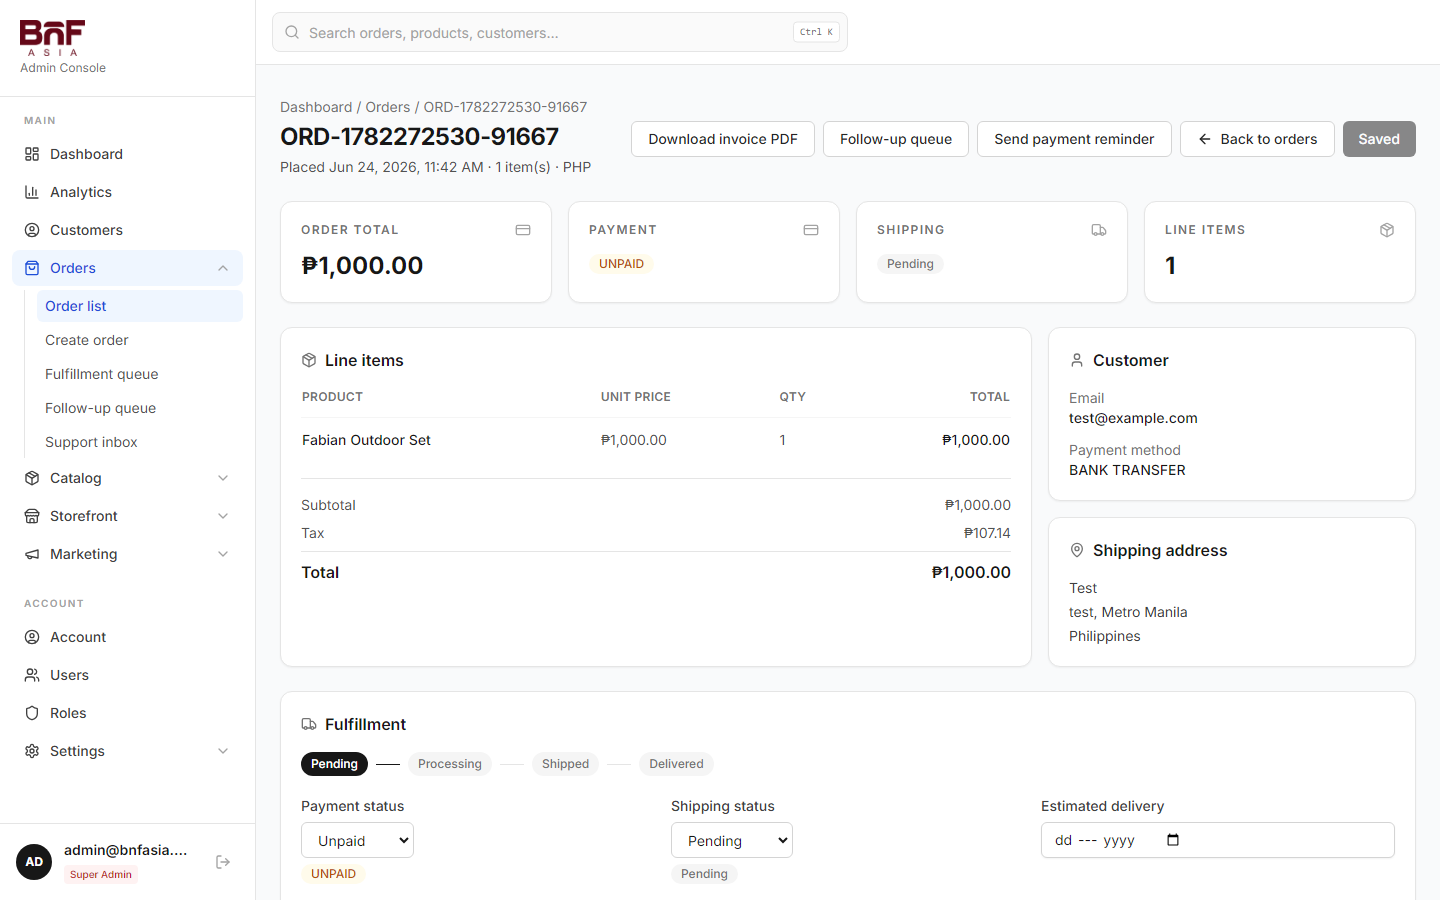
Order detail — actions
Fulfillment steps
- Set Payment status — Unpaid / Paid / Failed / Refunded
- Set Shipping status — Pending → Processing → Shipped → Delivered (or Cancelled)
- Enter Tracking number, Carrier, Estimated delivery
- Save changes — Customer may get email updates; shipped email sends when status is Shipped with tracking
Customer requests
When a shopper requests cancel or return, it appears here with status PENDING. Use Approve or Reject (optional staff note on reject). Approving cancel sets the order cancelled; approving return flags refund for processing.
Quote editor (support-assisted)
Adjust shipping/installation fees and send updated totals in chat.
Internal notes
Staff-only notes — customers do not see these.
Refunds
Set amount, reason, and status (Requested / Processed / Rejected).
Download invoice PDF
Exports the same PDF the customer receives by email.
Payment reminder
For unpaid orders — sends a reminder email with account link.
5 Catalog
Products (/products)

- Search, filter by category, stock level, and variant type (low stock uses platform threshold)
- Add, edit, delete products
- Batch tools on the toolbar — bulk update selected products or run CSV import/export
CSV import / export
Use the Import and Export menus on the products page:
| Action | Use when |
|---|---|
| Import new products | Bulk-create products from a CSV |
| Import product updates | Change price, stock, badges, or other fields for existing SKUs |
| Import new variants | Add variant rows to products that already exist |
| Import variant updates | Bulk-update variant price or stock (required for products with variants) |
| Export products | Download the current list for editing offline |
| Export variants | Download all variant rows for stock or price updates |
After import, review the summary for created, skipped, and failed rows.
New / edit product
Create: Click Add product → fill Basic info, Pricing & inventory, descriptions, badges, images, variants, installation → Create product.
Edit: Open the product → change fields → Save product.
Delete: Row menu (⋮) → Delete → confirm.
- Name, slug, SKU, descriptions, price, compare-at price, weight, stock
- Category (including top-level room categories such as Bedroom or Living Room)
- Badges (Featured, New, On sale, Best seller)
- Images — upload multiple; first image is the catalog thumbnail
- Variants — name, SKU, price, stock, options (e.g.
Finish: Walnut) - Installation flag and fee where applicable
Categories (/categories)

Organize the catalog, storefront filters, and homepage Shop by category cards.
- Create: Add category → name, parent (optional), description, cover image, sort order → Create category.
- Edit: Row menu → Edit → Save changes.
- Delete: Row menu → Delete → confirm (reassign products first if needed).
Collections (/collections)

- Create: Add collection → name, slug, type (Manual or Automated), products or rules, cover image → Create collection.
- Edit: Open collection → update products/rules → Save changes.
- Delete: Row menu → Delete → confirm.
Bundles (/bundles)

- Create: Add bundle → name, discount %, add products and quantities → Create bundle.
- Edit: Open bundle → change items or discount → Save changes.
- Delete: Row menu → Delete → confirm.
6 Storefront content
Homepage (/storefront/homepage)

Edit all home page sections from one CMS screen. Changes appear on the live home page after refresh (may cache ~1 minute).
| Section | What it controls |
|---|---|
| Hero banner | Main headline, image, and call-to-action |
| Collection blocks | Featured collection tiles with images and links |
| Category icons | Horizontal scroll of category shortcuts |
| Service highlights | Trust badges (shipping, warranty, etc.) |
| Product rows | Curated grids (on sale, new arrivals, featured, collection, category, bundles) |
| Promo banners | Mid-page promotional image banners |
| Sale countdown | Timed sale banner with end date |
| Shop by category | Large category cards on the home page |
Section visibility & scheduling
Under Visibility, toggle each section on or off and set optional show from / hide after dates. Status badges show Live, Hidden, Scheduled, or Ended.
Site settings (/storefront/settings)

Content pages (/storefront/pages)

Reviews (/reviews)

7 Marketing
Vouchers (/promotions)

- Create: Add voucher → code, discount type (percent or fixed PHP), dates, limits → Create voucher.
- Edit: Open voucher → Save changes.
- Delete: Row menu → Delete → confirm.
Customers enter codes at checkout.
Abandoned carts (/abandoned-carts)

8 Customers (/customers)

Read-only list of registered shoppers. Profile edits happen on the storefront account page.
9 Users & roles (Super Admin)
See Admin user onboarding for the full invite workflow, first-login checklist, and offboarding steps.
Users (/users)
- Click Invite staff.
- Enter email and temporary password (min. 6 characters).
- Select role — Super Admin or Store Manager.
- Click Create account and share credentials securely.
Use the row menu to Change role, set a new password, or Deactivate accounts that should no longer sign in.
Roles (/roles)

View permission groups. Custom roles may be available depending on your deployment.
10 Settings
Open Settings in the sidebar.
Overview (/settings)

General (/settings/general)

Store & tax
- Store name, support email, phone, business address (used on invoices and emails)
- PHP per USD rate
- Free shipping toggle and minimum order amount
- VAT rate and enable/disable
- Prices include VAT — controls "incl. VAT" messaging on checkout
- Storefront URL
Checkout
| Setting | Effect |
|---|---|
| Order notes at checkout | Show/hide delivery instructions field |
| Guest checkout | Allow checkout without account |
| COD / GCash / Maya toggles | Enable payment methods for Philippines |
| BNPL | Show installment option (manual follow-up) |
| Support-assisted checkout | Logged-in PH customers can place quote-based orders |
| Abandoned cart recovery | Track carts and allow recovery emails |
| Abandoned cart delay (hours) | Wait before a cart is eligible for recovery |
| Recovery discount code | Auto-appended to recovery email links |
| Low stock threshold | Dashboard and product "low stock" filters |
| Stale quote alert (days) | Flags old support quotes in follow-up queue |
Shipping & pickup (/settings/shipping)

Add and edit rates:
- Label (customer sees this at checkout)
- Region: PH or International
- Zone (NCR, Luzon, etc.) and weight range when needed
- Delivery time — e.g. "5–7 business days"
- Fee in PHP
- Sort order — lower numbers listed first
- Active toggle
Pickup locations — manage showroom pickup addresses used at checkout.
Payment gateways (/settings/payments)

Tabs: Store & tax, Checkout, PayMongo, Stripe.
- PayMongo — enable GCash / Maya for Philippines; confirm provider shows Connected
- Stripe — enable international card payments; confirm provider shows Connected
Use live keys in production. A test-mode banner appears when test keys are active — contact your administrator to switch to live keys.
Email templates (/settings/email-templates)

Edit subject and body for:
| Template | When sent |
|---|---|
order_confirmation |
After order placed — PDF invoice attached when SMTP works |
order_shipped |
Order marked shipped with tracking |
abandoned_cart |
Cart recovery — use {{recoveryUrl}}, {{discountCode}} |
payment_reminder |
Manual reminder from order detail |
Placeholders use {{name}} syntax.
Test email — enter your email and click Send test email at the top of the templates page. If delivery fails, contact your administrator.
Logs


| Page | Purpose |
|---|---|
| Payment logs | PayMongo/Stripe webhook history; filter by order |
| Audit logs | Staff actions (order updates, settings changes, etc.) |
11 Daily workflows
New COD order
- Orders → open order → confirm address and items
- Processing when preparing
- Shipped + tracking + carrier → save (customer gets shipped email if SMTP on)
- Delivered on arrival; set Paid if COD
Paid online order
- Check Fulfillment queue
- Fulfill as above — payment should already be Paid
Support-assisted quote
- Customer places order with Support-assisted payment
- Support inbox or order detail → chat
- Adjust quote fees → customer accepts → mark paid when ready
Cancel / return request
- Customer submits from account
- Order detail → Customer requests → Approve or Reject
- Process refund on order if needed
New product launch
- Products → Add → basic info (or Import → Import new products for bulk CSV)
- Edit → images, variants (or Import new variants for bulk)
- Optional: Collection, Homepage feature, Promotion
Sale / campaign
- Promotions — create code
- Homepage — update promo bar
- Optional: abandoned cart recovery discount code
Recover abandoned carts
- Confirm SMTP + template
- Set delay and optional discount in Settings → General
- Dashboard → Send recovery emails
12 Troubleshooting
| Problem | What to check |
|---|---|
| Cannot sign in | Check credentials; ask Super Admin to verify account is active |
| Customer can't complete checkout | Guest checkout off? Out of stock? Payment method disabled for their country? |
| No confirmation email | Super Admin: Email templates → Send test email |
| Payment paid but order still Unpaid | Check Payment logs; contact administrator if webhook failed |
| GCash/Maya not shown | PayMongo enabled in Payment gateways and GCash/Maya toggles on in General |
| Low stock alerts wrong | Low stock threshold in Settings → General → Checkout |
| Manager can't open Settings | Role restriction — contact Super Admin |
| Images won't upload | Contact your administrator |
| Test banner won't go away | Super Admin: switch payment gateways to live keys |
13 Training checklist
Start with the Admin user onboarding plan, then complete the items below by role.
All staff
- Sign in, use global search, read Dashboard alerts
- Find orders, update shipping status and tracking
- Create a product with images; approve a review
Catalog team
- Create, edit, delete categories, collections, and bundles
- Manage variants; import and export products via CSV
Fulfillment team
- Fulfillment queue; COD paid on delivery; manual orders
- Cancel/return requests; invoice PDF download
Super Admin
- Invite staff; shipping rates and pickup locations
- Payment gateways; email templates; audit logs
14 Quick reference
Shipping flow
- Philippines payments (typical): GCash, Maya, COD, BNPL (optional), Support-assisted (optional)
- International payments (typical): Stripe card
- Customer invoice: Generated as PDF on order confirmation email and available from account + admin order detail